LegalOffice billing provides the ability to raise a tax invoice for time worked and disbursements incurred.
Billing consists of two stages. The first is to create a draft bill, which is then edited to contain the narration and charges required. When editing is complete the bill is updated and bill number allocated. The bill can then be printed and/or emailed directly to the debtor client.
The billing program is by necessity highly functional and complex. The program helps the bill author by using pre-set conditions and defaults to automatically populate the draft bill. This gives the author the ability to create a bill with the only changes required being the bill narration, fee amount and disbursement amounts.
Create a draft bill from;
- MyMatters – Right click on the matter record and select the option ‘Raise Bill’;
- Matter Inquiry – Right click on the matter summary screen and select the option ‘Raise Bill’;
- Bulk Billing Tab – Right click on the draft bill grid and select the option ‘New’.
The draft bill will open and display;
Bill Header Tab
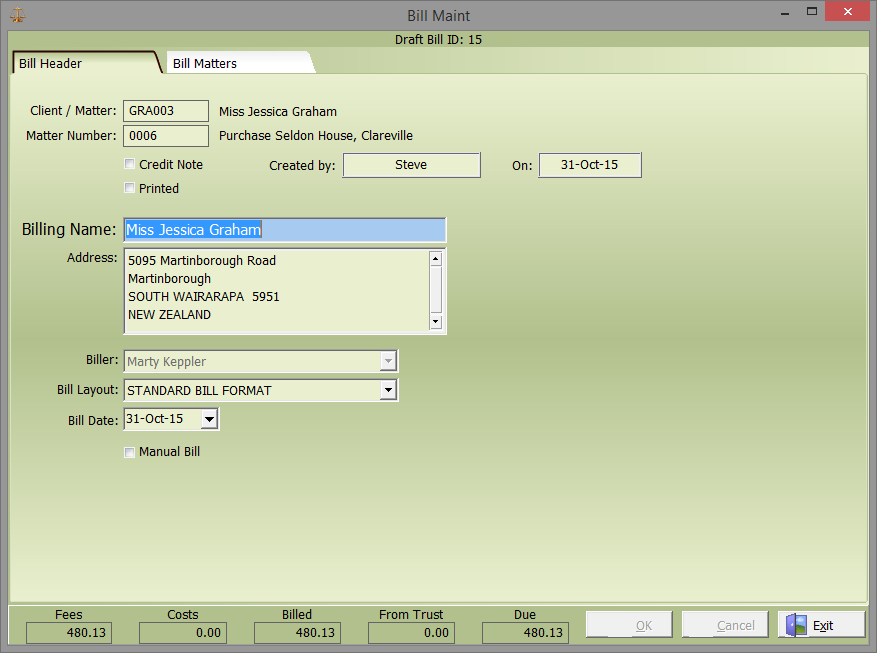
Bill header displays header information for the draft bill. Displayed fields include;
Client and matter number
Created by and created date
The credit note and printed flags are for use when looking at an updated bill
Billing name and address default from your client record. These can be changed on the individual bill if required. If the information is incorrect, you should consider changing the client information so that future bills default correctly.
Note any debtor statements or AR notices will follow the bill address.
Biller will default to matter acting fee earner. It is this author who receives credit for the overall bill.
Bill layout determines how the bill is presented when printed.
The bill date will default to the current date. This can be changed to reflect the bill date required.
Select Manual bill if you wish to enter a manual bill number. Otherwise, the system will allocate the next sequential bill number.
Totals displayed along the bottom of the bill header show the current bill values.
Review this screen making changes as necessary. Once you are satisfied the details are correct click the OK button and select the Bill Matters tab to continue processing.
Bill Matters
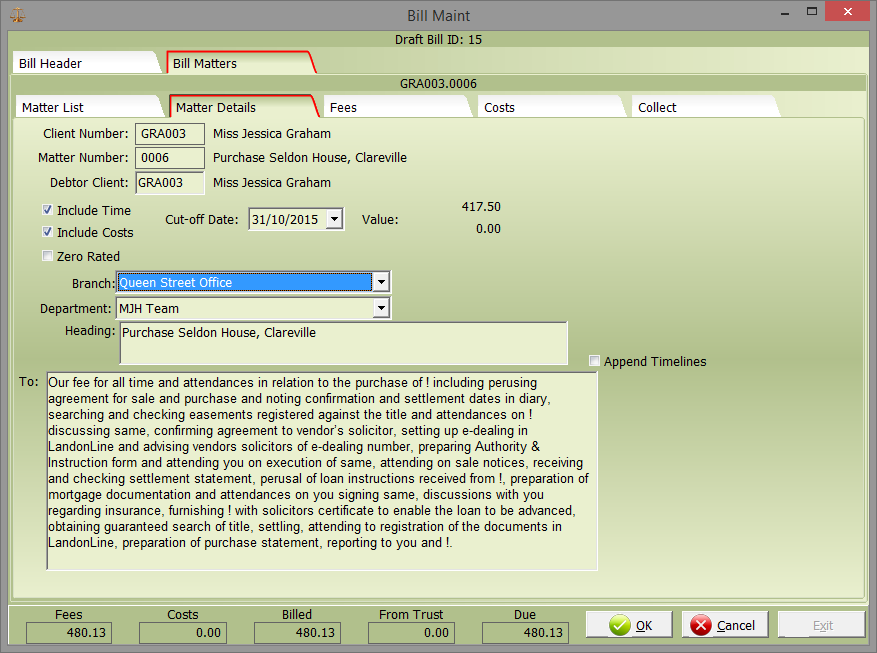
Matter Details
The Bill Matters detail tab displays information relating to the matter being billed. Displayed fields are;
Include Time has defaulted from when the draft bill was created. You can elect to either have or not have time included in this bill.
Include Costs has defaulted from when the draft bill was created. You can elect to either have or not have disbursements included in this bill.
The cutoff date has defaulted from when the draft bill was created. You can select a cutoff date so that only time & disbursements included on this bill will have been recorded prior to your selected date.
The zero rated indicator determines whether GST will be added to the bill. When selected, all time and disbursement transactions will be billed exclusive of GST.
The branch and department default from the matters acting author. This determines how the bill is apportioned in the fees performance system and General Ledger. Changes should be discussed with your administrator first.
Heading is the title printed on the physical bill. It will default from the matter description but can be altered as needed.
To: is the bill narration text and this will print on the bill. This field is unlimited in size and the text can be altered as needed. Simply click into the field to enter a narration or, double click the field to open an expanded view. The expanded view has further options such as spell checking and narration formatting.
When selected, the append timelines box will insert timeline details in to the narration field. These then can be edited as needed.
The first lines of summary totals along the bottom of this screen reflect the values being attributed to the matter number displayed on the bill matters screen.
To create a multi matter bill, select the Matter List tab, right click and select add additional matter. Then complete the Matter Details process described above.
Once you have completed and reviewed this screen, select OK.
To continue editing the draft bill select the Fees tab
Fees
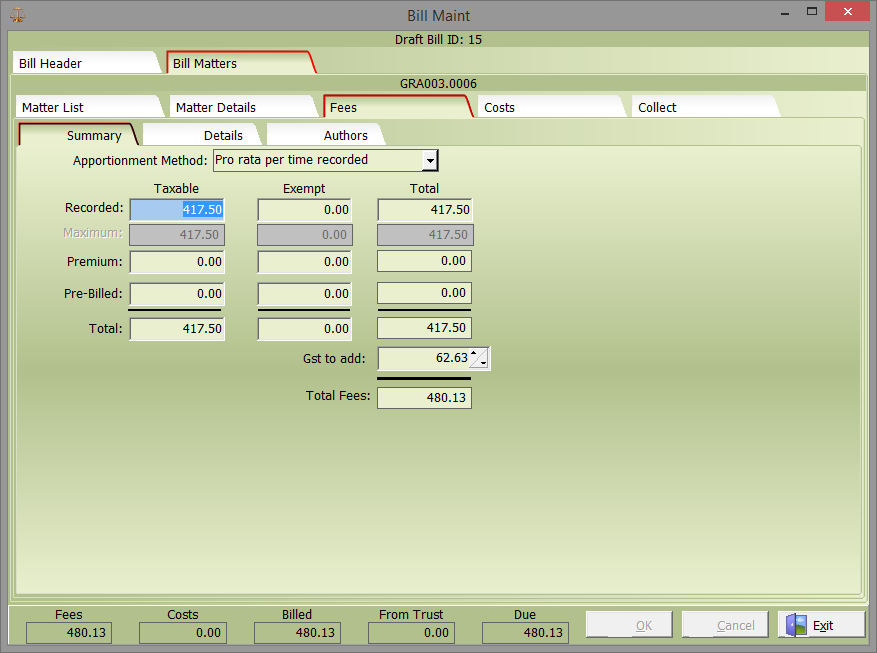
Fees Summary
The Bill Matters Fees Summary screen displays the value of fees being charged on this bill. Fees are made up of time recorded, premium and pre billed time (time charged in advance of the work being done).
This screen is where you edit the value of most bills, that is, where the time / premium / pre bill combination is to be apportioned pro rata across authors who have worked on the matter.
Pre billed time values entered on this screen will be apportioned solely to the matter acting author.
If the fee, or a portion of the fee is to be billed exempt, enter the appropriate values in the exempt rather than the taxable fields.
Recorded
This will default to the value of time recorded and unbilled up to and including the cut off date set on the matter details tab. The maximum value displaying directly below the recorded value is the total value of time recorded on the matter. These values can be different.
Enter the value of the time you wish to bill into the recorded field. Any balance of time will remain on the matter for future billing. Then select the OK button. The system will bill the earliest time and if needed, will split timelines to leave the correct amount unbilled.
Premium
Enter the value of any premium to be included on the bill. Premium can be a positive value (Mark Up) or negative value (Mark Down).
Pre Billed
Enter the value of any pre billed time be included on the bill. Remember pre billed time entered on the summary screen will be allocated as fees to the acting author. However, when future time is recorded on the matter, regardless of the author, the system will post match against the pre billed value and reapportion fees accordingly.
Total
This is the total fee being charged on the bill. Verify this is the amount of the fee you wish to charge the client.
If you have completed the bill fees you can select OK and then move on to the Costs (Disbursements) tab. Otherwise click on the Details tab to edit individual time and author details.
Fee Details
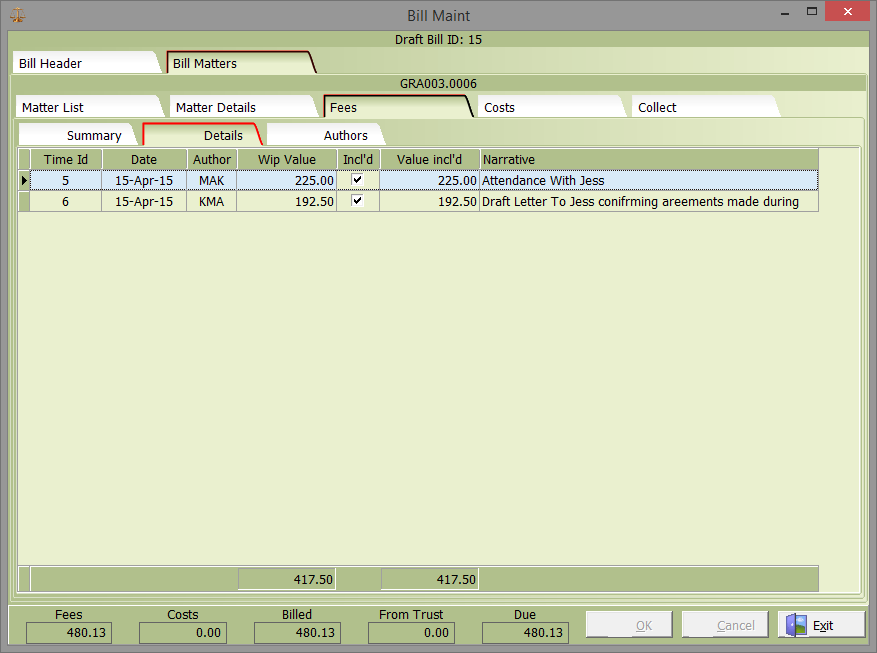
The Fee details screen displays all unbilled timelines for the matter. Those included in the bill have the Incl’d box ticked. Additional timelines may be included in the bill by ticking the Incl’d box for the selected timeline.
Timelines can be partially billed by entering a reduced value in the Value included field. When the bill is updated, the timeline will be split into two, one being billed and included on this bill, the other remaining as WIP for future billing.
Fee Authors
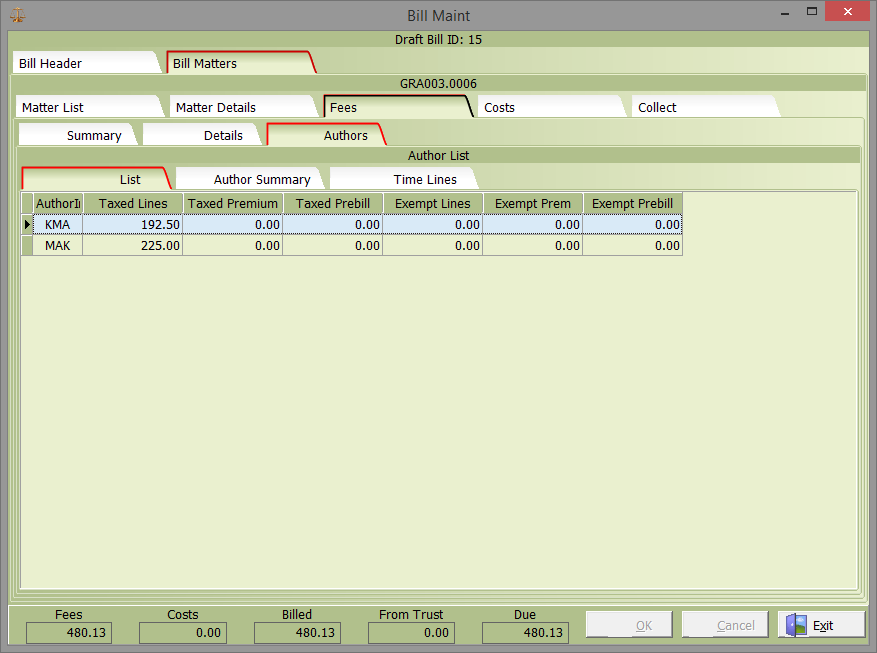
The Fees Author list tab displays the value of time and fees allocated to individual authors on the bill. By default, only authors with time recorded will be included. To add an author who has not recorded time but to whom premium or pre billed time is to be billed, right click and select the new author option. Select the appropriate author and using the Author summary tab enter the correct values for the author.
Authors can be removed from the bill using the delete button. This does not delete the time lines but simply removes their time from this bill. To amend an Author time details double click on the record to open the Fee Author Summary tab.
Fee Author Summary
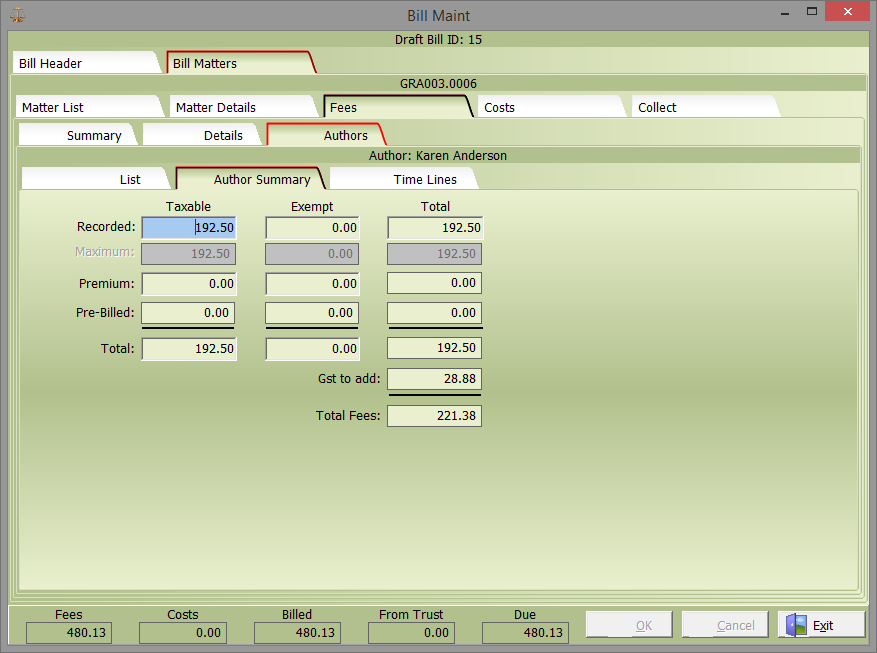
The author summary tab has the same functionality as the bill matters fees summary screen except now you are working on a single author, not the entire bill. Use this screen to manually create the time fee values to be used and apportioned to the individual authors. To view or amend timelines for this author click on the Fee Author Timelines tab.
Fee Author Timelines

The Authors time lines tab has the same functionality as the Bill Matters fee details tab except now you are working on a single author, not the entire bill. Use this screen to manually select/un-select time lines to be used and apportioned to the individual authors.
When you have completed your time fee allocations return to the Bill Matters fees summary screen to verify the values entered match the values you want to bill the client.
Once you have reviewed this screen and are satisfied the details are correct select OK.
You can now continue editing the Bill by selecting the costs tab.
Costs Summary
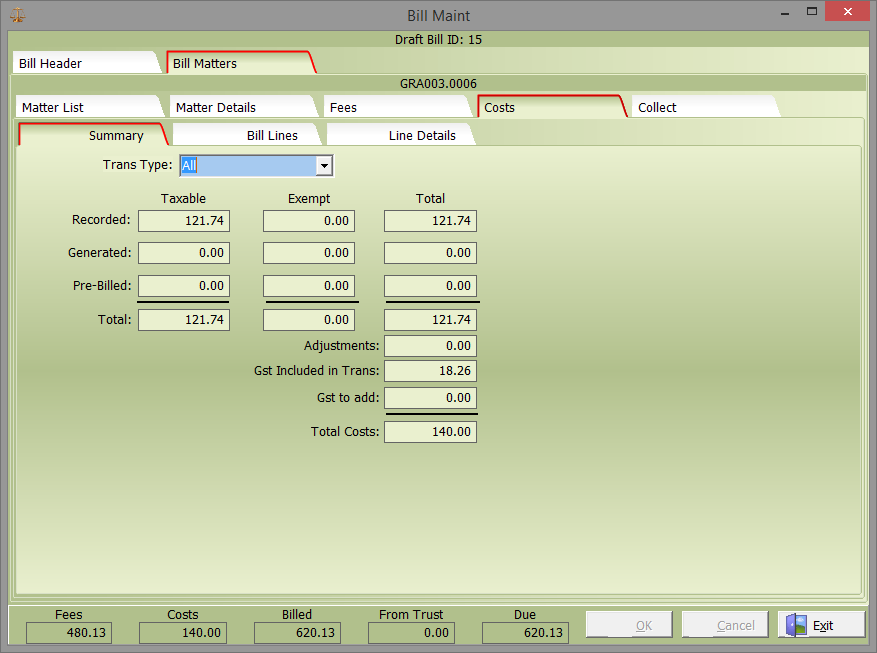
The costs summary tab displays balances of disbursements included in the bill. You can select by transaction type to see individual balances i.e. non cash disbursements, cheque disbursement or creditor invoice totals.
Any editing of costs for the bill is performed on the bill lines or line details tabs.
Recorded
This is the balance of disbursements already posted to the matter which are unbilled when the draft bill was created.
Generated
This is the balance of disbursements that have been added in this bill. These will be posted as disbursements on the matter and included in the bill.
Disbursements can be added manually or by the system if set to do so. An example would be a standard charge for Office Costs being applied automatically to every bill generated.
Pre Billed
This is the balance of disbursements to be pre billed in this bill.
To make changes to costs switch to the Cost Bill Lines tab
Bill Lines
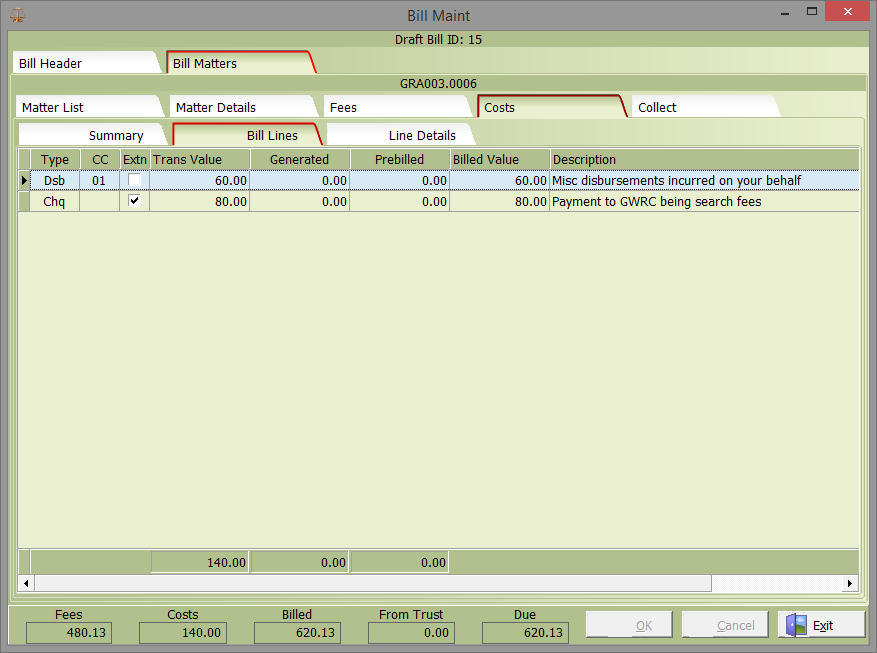
The bill lines screen displays individual disbursement transactions included in this bill. To edit a disbursement shown, double click on the record which opens the line detailstab for the record.
To add a new disbursement, right mouse click and select ‘add costs line to bill’.
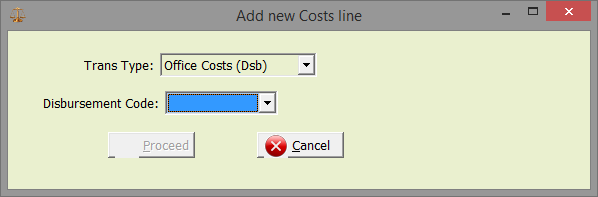
Select the correct transaction type i.e. non cash disbursements or Cheque disbursement followed by the correct disbursement code, then select the proceed button.
Cost Line Details
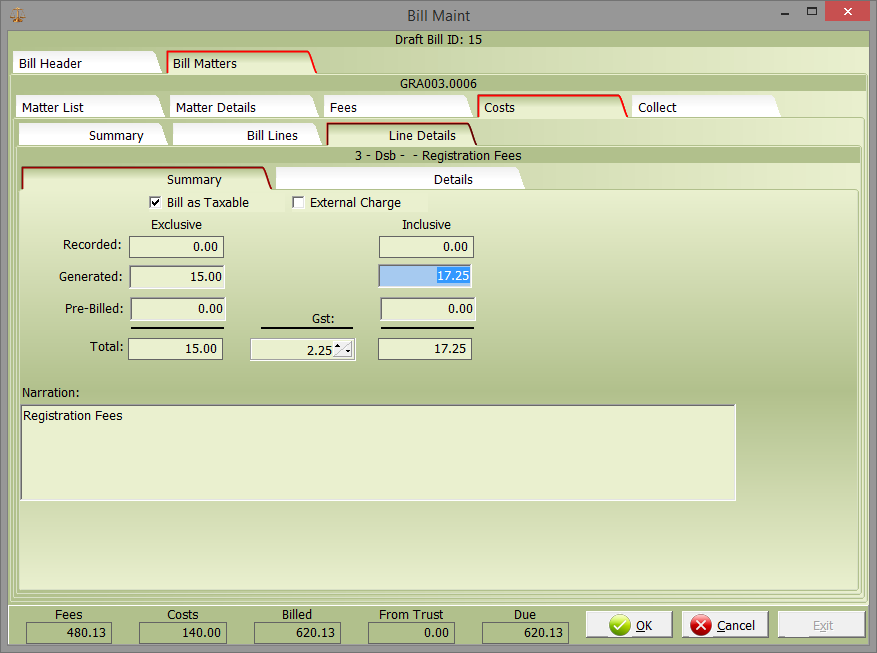
The Taxable check box determines whether the cost is billed with GST or not.
The External check box indicates whether this cost appears on the printed bill as a disbursement or an office charge. This option will default from the transaction code selected but can be overridden if needed.
You can either generate a cost or pre bill a future cost yet to be incurred. These can be entered either exclusive or inclusive of GST.
The narration will default from the disbursement type and can be expanded on or changed as needed.
If you have more than one type of disbursement to bill, return to the bill lines tab and repeat this process until you have entered all the required disbursements.
When you have completed your disbursement editing return to the Bill Matters Costs Summary screen to verify the values entered match the values you want to bill the client.
Once you have reviewed this screen and are satisfied the details are correct select the bill matters collect screen.
Bill Matters Collect

The collect screen is used when the client has funds available in trust to pay the bill immediately. Enter the value you wish to transfer from trust in the ‘Amount to take from Trust’ field.
The matter, client and IBD balances are displayed to assist you.
Bill Update
Once editing is complete check the bill totals at the bottom of the screen are the values you wish to bill your client. T
Use the righ click menu to preview the bill making sure it is correct. To update the bill, right mouse click and select the appropriate action.