Any person needing to use LegalOffice should be set up as a distinct user. Individual users have their own specific configuration determining program access and security levels.
You create or maintain Users using the User Maintenance app.
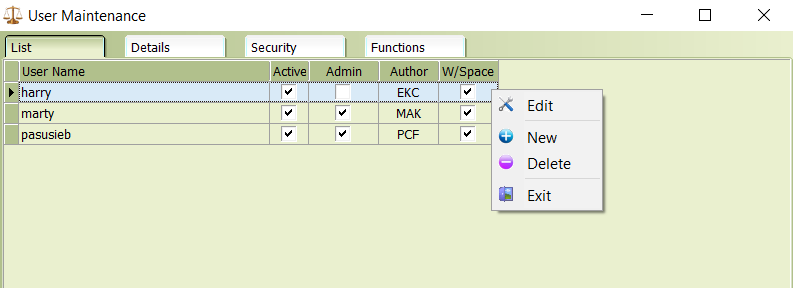
Use the mouse right click button to display the options menu – select NEW to add a User
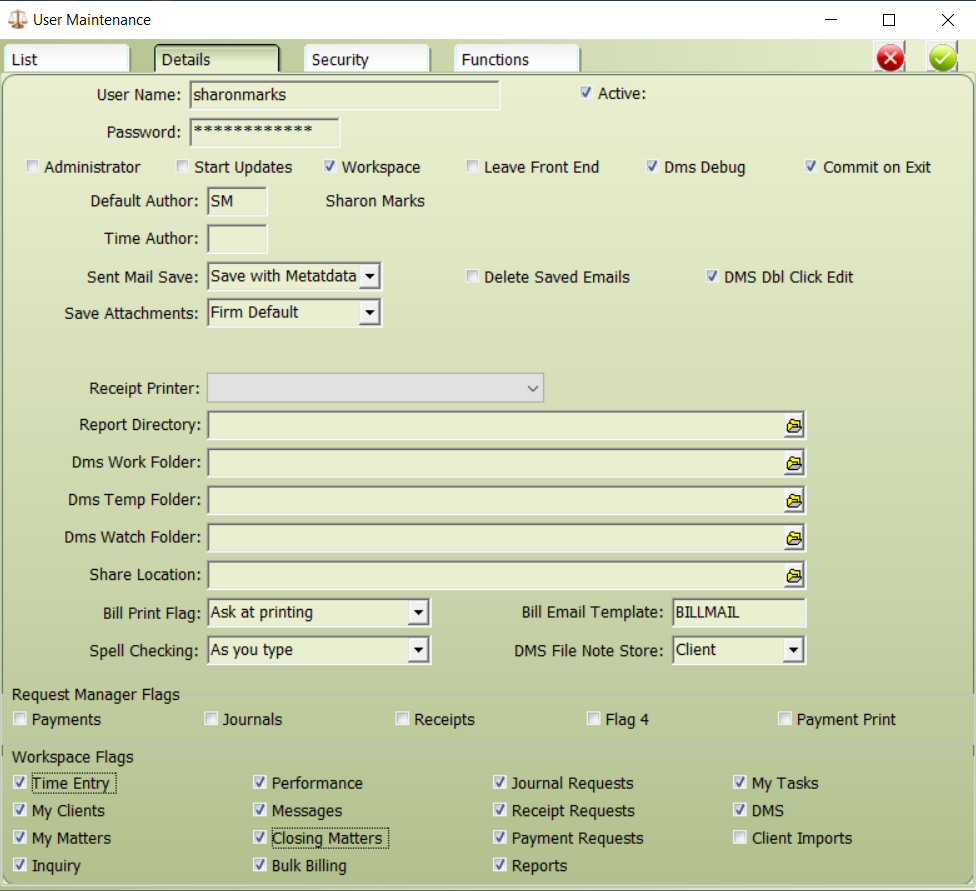
Complete the User details screen using the following explanation of the fields and their usage;
User Name
The username should be entered as lowercase. A good standard convention to adopt is the user forename followed by their surname, for example robertsmith
Password
Set the password for the user. A good standard convention to adopt is a password with a minimum of 12 characters including at least 1 uppercase character and one numeric character. Using a passphrase is useful for remembering these lengthy passwords, for example 1HarryReadAlot
Administrator
Select this option if the user is to be a system administrator with full system access.
Start Updates
Only to be set for admin users who are responsible for updating the LegalOffice software at your firm.
Workspace
Tick this box to display the Workspace interface when the user logs on
Leave front End Running
Select this box to display both the back end accounting menu and Workspace when the user logs on. This is useful for administrators.
DMS Debug
Select this box to enable full logging of all DMS activity for this user.
Commit on Exit
Select this box to prompt users to commit any uncommitted document’s when logging out.
Default Author
Select the default author associated with this user. Where the user is an author, enter their own author initials. For secretarial staff, enter the initials of the author they are responsible to. For accounts staff or administrator users, leave this field empty.
Time Author
An optional setting which allows a user to have a different default author for time entry. Commonly used by users who work for and assist multiple authors.
Sent Mail Save
Select the appropriate default setting to save this user’s email into the DMS. Valid options are;
- Don’t save
- Save without Metadata
- Save with Metadata
Delete Saved Emails
Select this box so emails saved to the DMS are automatically moved from the user Outlook Inbox to the Outlook deleted items folder.
DMS Double Click Edit
Select this box so that a double click on a DMS document opens the document in edit mode. Leave the box unticked means a double click on a DMS document opens the document in view mode.
Save Attachments
This field will determine how attachments included within emails are treated.
- Firm Default – follow the setting made within the firm control file.
- Yes – always save email attachments to the DMS as a separate file.
- No – never save email attachments to the DMS as a separate file.
This setting can be overridden when the email is saved and regardless of this setting, any attachments included in an email will be saved embedded in that email.
Receipt Printer
Only required if the user has a receipt printer which is different to the firms default receipt printer. If this is the case, add the appropriate printer.
Report Directory
Only required if the user has a report directory which is different to the firms default report directory. If this is the case, add the full path to the user specific report directory. Useful if you wish to restrict what reports are available to individual users.
DMS Work Folder
Only required if the user has a work folder which is different to the firms default work folder. This is the local folder where DMS documents are checked out to while they are being edited. Check with your administrator for details of this folder location. If this is the case, enter the full path to the user specific work folder.
DMS Temp Folder
Only required if the user has a temp folder which is different to the firms default temp folder. This is the folder used by various DMS functions like attaching documents to an email, making a PDF from a different file type, sharing documents with third party applications like Dropbox
These files are held temporarily and are cleansed on logon. Check with your administrator for details of this folder location. If this is the case, enter the full path to the user specific temp folder.
DMS Watch Folder
Only required if the user has a watch folder which is different to the firms default watch folder. This is the local folder used to capture all files being imported into the DMS. Check with your administrator for details of this folder location. If this is the case, enter the full path to the user specific watch folder.
DMS Share Location
Only required if the user has a share location different to the firms default watch folder. This is the local folder used by your preferred document sharing app like Dropbox, OneDrive or The Box. Check with your administrator for details of this folder location. If this is the case, enter the full path to the user specific watch folder.
Bill Print Flag
Determines how bills updated by the user are processed. Valid options are;
Print only – Updated invoices print directly to the users bill printer
Ask at printing – User is asked at time of update how to process the bill
PDF to DMS – A PDF copy of the bill is saved to the DMS
PDF to DMS and email – A PDF copy of the bill is saved to the DMS and a draft email is created with a copy PDF attached.
Bill Email Template
Determines which Richtext email template to use when directly emailing client bills.
Spell Checking
Determine how the spell check functions for this user;
- None – don’t enable spell check
- Manual – show spelling mistakes and allow users to select a correction
- As you type – show word spelling options based on the characters entered
- Auto correct – suggest and automatically correct mistakes
DMS File Note Store
Set which DMS store file notes created in time slips are saved to
Requests Manager Flags
Used to set which tabs appear on the administrator users Request Manager program. Valid options are;
Payments – Manage all payment requests from inception to update
Journals – Manage all journal requests from inception to update
Receipts – Manage all receipt requests from inception to update
Payment Print – Manage all payment Print and Transfer processes. This is where you select a cheque printer or Online Banking interface
Workspace Flags
Select the functions to be made available for the user in Workspace. Valid selection are;
Time Entry, MyClients, MyMatters, Inquiry, Performance, Bulk Billing, Messaging, Journal Requests, Payment Requests, Receipt Requests, Reports, MyTasks and DMS
Click the OK button to save your new user record. Now switch to the Users Security tab to grant access rights.