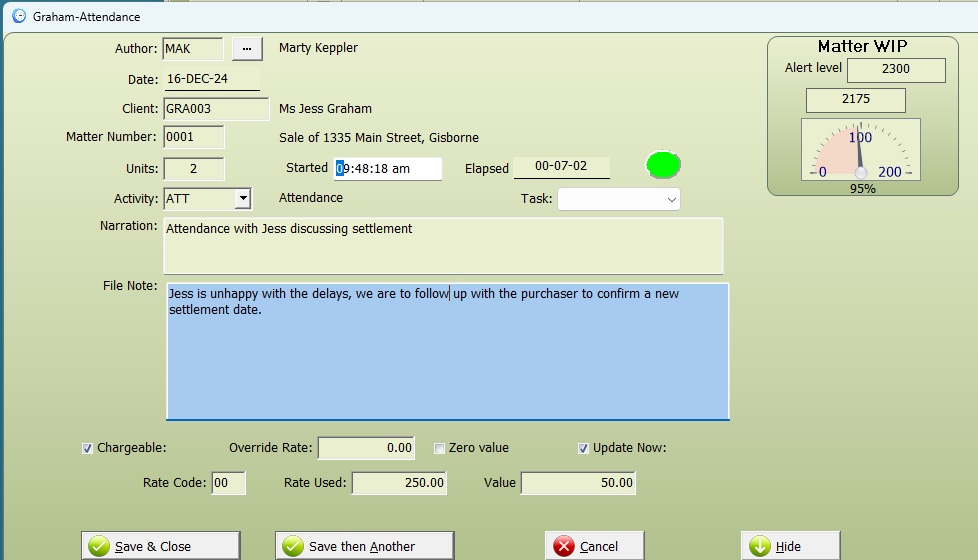
To add a timeline, open the Time Slip app.

You can open the Timeslip app from the following options:
- Workspace Time Entry: Right-click on the grid and select New Timeslip.
- My Clients: Right-click on a client record and select Add Timeslip.
- My Matters: Right-click on a matter record and select Add Timeslip.
Using the clock timer
- Start the Timer: Click the timer button. When the timer is running, it turns GREEN.
- Pause the Timer: Click the timer button again. A paused timer turns YELLOW.
- Stop the Timer: Click one of the save options to stop the timer and save the timeline.
Complete the Timeslip fields as required. Fields marked with an (*) are mandatory or strongly recommended.
Note: When using the timer, the Units field will be automatically populated based on the timer.
When data entry is complete, choose one of the save options:
- Save and Close: Saves the timeslip and closes the app.
- Save and Add Another: Saves the timeslip and keeps the app open for further entries.
- Author Code (*)
- Defaults to your author initials but can be changed using the F2 lookup function.
- Date (*)
- Defaults to the selected timesheet date (if opened from the Time Entry screen) or the current date (if opened from any other screen).
- Client (*)
- Enter a client reference manually or use the F2 lookup function to search and select. You can also enter an invalid reference if the client does not exist yet.
- Matter (*)
- Enter a matter reference manually or use the F2 lookup function to search and select. An invalid reference can be entered if the matter does not exist yet.
- Units (*)
- Specify the number of units to record.
- Activity (*)
- Choose an activity code from the dropdown menu or type a valid code directly.
- Task
- Select a task code from the dropdown menu if the matter uses task-based billing.
- Narration (*)
- Provide a description of the work completed.
- File Note
- Add a file note if required. Right-click to attach a physical file note to the matter’s digital DMS file.
- Chargeable
- Tick this box to mark the timeline as chargeable. It will then show as WIP for the matter.
- Override Rate
- By default, the author’s standard hourly rate is used. You can enter an alternative rate by specifying a $ value here.
- Zero Value
- Tick this box to record the timeline with a value of $0.00. It will still appear as WIP but will show as chargeable time in author performance stats.
- Update Now
- Tick to update the timeline immediately when saved. If left unticked, the timeline will be saved but remain in edit mode for further changes.
- Rate Code
- Displays the rate code used to calculate the timeline value.
- Save and Add Another
- Saves and closes the current timeline while keeping the timeslip open for additional entries.
- Hide
- Minimizes the timeslip to the taskbar, allowing you to recall it later.